
TL;DR:
- Most UK flooring retailers benefit from an online calculator that helps customers accurately estimate material needs, reducing workload and increasing trust. Building an effective tool requires clear planning, supporting accurate data collection, handling irregular layouts, and ensuring transparency in calculations to foster customer confidence. Rigorous testing, proper unit handling, and expert support are essential to develop a reliable calculator that converts browsers into buyers and enhances overall lead generation.
Most UK flooring retailers spend hours every week answering the same question: “How much flooring do I need?” Multiply that across your whole sales team and the cost adds up fast. A well-built online flooring calculator fixes this. It lets customers self-serve at midnight on a Tuesday, arrive at your showroom already knowing what they need, and trust your business before they’ve spoken to anyone. This guide walks you through exactly how to plan, build, test, and launch a calculator that converts browsers into buyers and cuts your team’s quoting workload significantly.
Key Takeaways
| Point | Details |
|---|---|
| Match real sales process | Your calculator should mirror how your UK retail staff recommend and sell flooring in store for maximum trust. |
| Transparent logic drives trust | Clearly show every assumption and calculation—inputs, waste, rounding—for more leads and fewer disputes. |
| Test for every scenario | Ensure your calculator works for standard, irregular, and patterned layouts with robust results customers can verify. |
| Always use full packs | Never allow partial cartons—always round up—so quotes match real supplier pack sizes. |
| Refine with user feedback | Launch is just the beginning; ongoing improvements and A/B testing will grow conversions long-term. |
What you need before you start
Before a single line of code gets written, you need a clear picture of what your calculator must do. Rushing straight to development without preparation is one of the most common mistakes we see flooring businesses make.
Start with the technical side. You’ll need access to your website platform, whether that’s WordPress, WooCommerce, Shopify, or a bespoke CMS. You’ll also need either a developer on hand or a reliable plugin that supports conditional logic and custom formula fields. Your product data must be clean and up to date. That means accurate box sizes, pack coverage in m², and pricing per unit for every line you want to include in the tool.
On the business side, think carefully about which product ranges to cover first. Carpet, LVT, engineered wood, and solid hardwood all have different coverage rules, waste considerations, and unit conventions. Trying to build one calculator that handles all of these simultaneously from day one is ambitious. Start with your two or three best-selling lines.
Here is what you need to gather before briefing anyone to build:
- Room shape types your customers most commonly ask about (square, rectangular, L-shaped, open-plan)
- Pack sizes and coverage areas for each product line
- Your standard waste percentages per product type and layout style
- Whether you sell by m², by pack, or both
- Your preferred default unit (always m² for UK audiences)
A practical flooring calculator should be driven by area calculation first, applying a waste factor before converting to purchasable units. This sequence is non-negotiable. Skip it and your outputs will be wrong, and customers will notice.
Review your flooring website essentials to check whether your existing site structure is ready to support an interactive tool like this before you commit to building.
Here is a quick overview of the key data you need to collect:
| Data type | Example | Where to source it |
|---|---|---|
| Pack coverage | 2.24 m² per pack | Supplier product sheets |
| Typical room sizes | 3m × 4m living room | Sales team records |
| Waste factor by layout | 5% straight, 12% herringbone | Industry guidance |
| Box rounding rule | Always round up | Supplier terms |
| Unit preference | m² (default) | UK market standard |
Pro Tip: Pull your last three months of enquiry data and identify the five most common room sizes and product types your customers ask about. Build your calculator around those first. A complete flooring renovation typically involves multiple rooms and product types, so designing for flexibility from the start pays off.
Step-by-step: Build your calculator logic
With the right foundations prepared, it is time to build out the calculator logic step by step. This is where the detail matters most. A calculator that gives slightly wrong results, or one that confuses customers with unclear steps, will damage trust rather than build it.
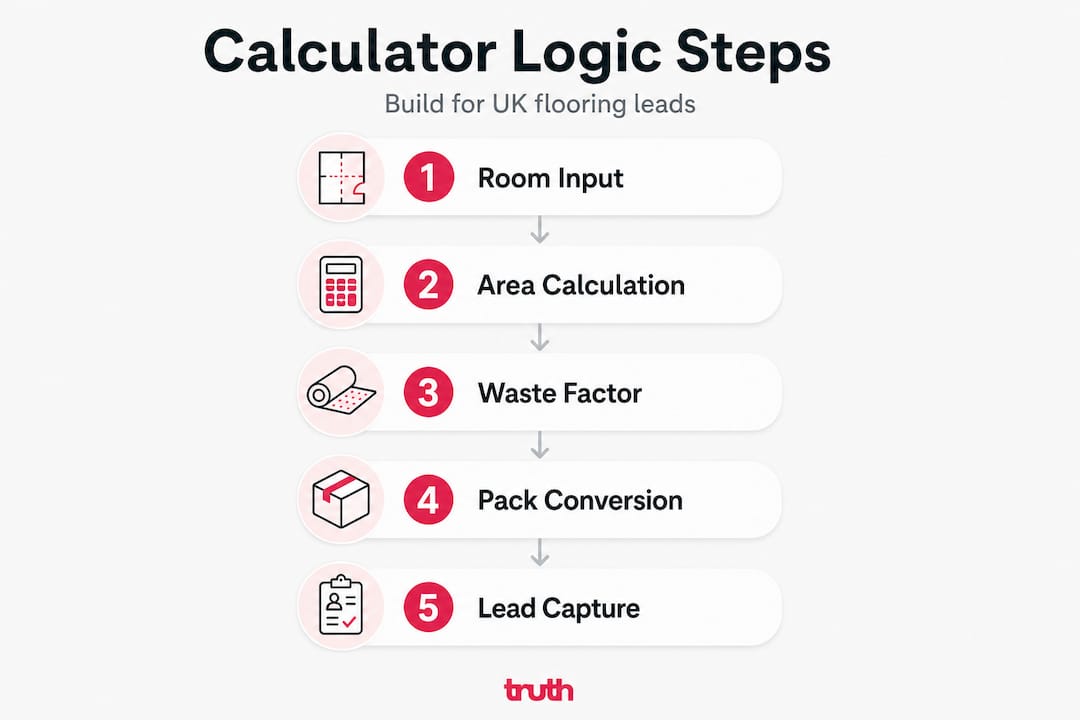
Here is the sequence we recommend:
- Collect room dimensions. Ask for length and width in metres. For non-rectangular rooms, allow the user to add additional sections or split the room into rectangles.
- Apply the layout multiplier. Straight lay needs no multiplier. Diagonal or herringbone layouts require an additional factor, typically 15% to 20% extra material.
- Calculate the gross area. Multiply length by width to get net m². Add the layout multiplier if applicable.
- Apply the waste factor. Add the appropriate percentage for cuts, edges, and future repairs. Default to 5% for straight lay and 10% or higher for pattern work.
- Convert to packs or boxes. Divide the total m² required by the pack coverage figure and round up to the next whole number.
- Display a clear summary. Show the user their net area, gross area including waste, number of packs required, and an optional indicative cost.
For UK-oriented implementations, calculators commonly allow multiple room inputs including non-rectangular layouts, with adjustable waste factors for cuts, patterns, irregular spaces, and transitions. Build this in from the start rather than retrofitting it later.
Compare the two main logic paths you’ll need to support:
| Feature | Standard rectangular layout | Multi-room or irregular layout |
|---|---|---|
| Input method | Single length × width | Multiple room sections summed |
| Waste factor | Fixed default (5%) | Variable per section |
| Complexity | Low | Medium to high |
| User guidance needed | Minimal | Diagrams or step labels |
| Development time | Short | Longer but worth it |
Edge cases matter as much as the base formula. Diagonal and herringbone patterns, irregular rooms, transitions, trim, and expansion gaps all change effective material requirements and should be configurable options in your calculator. Leaving these out means your tool will fail a significant proportion of your real-world customers.
Explore how adding products to your site connects with calculator outputs to create a seamless journey from estimation to purchase. And when considering how inputs are laid out on screen, look at UX improvements for leads to make sure the interface itself does not get in the way of conversions.
Caution: Mismatched units are a silent conversion killer. If your product data is in ft² but your calculator outputs m², customers will get wrong results and blame your business. Audit your data before launch and enforce a single unit standard throughout your system, converting only at the display layer.
Pro Tip: Offer default waste factors clearly labelled in the interface. For example: “Standard lay (5% included)” and “Diagonal or herringbone (10% included).” Give users the option to override these with a custom figure. Customers who know their fitter uses a specific waste allowance will appreciate the flexibility. Browse complex flooring layouts for real-world examples of how varied these jobs can be.
Rounding, units, and compliance: Getting the details right
Now that your calculator can solve essential layouts, focus on the vital details that build trust and prevent costly errors. This section covers the parts most retailers overlook until a customer complains.

The first decision is unit convention. In the UK, m² is the overwhelmingly dominant unit for measuring and buying flooring. Your calculator must default to metres and square metres. That said, a segment of your customers, particularly older buyers or those who inherited older measurements, will work in feet and inches. Offering a toggle to switch between metric and imperial is a small development task with a meaningful impact on usability.
A robust calculator must handle unit economics carefully. Flooring is sold by packs or cartons, not loose square metres, so box maths and rounding rules must be built into the logic from the start.
Here is how box rounding works in practice:
| Net m² needed | Waste added (5%) | Gross m² | Pack coverage | Packs required (exact) | Packs to order |
|---|---|---|---|---|---|
| 12.0 | 0.60 | 12.60 | 2.24 | 5.63 | 6 |
| 18.0 | 0.90 | 18.90 | 2.24 | 8.44 | 9 |
| 25.0 | 1.25 | 26.25 | 2.24 | 11.72 | 12 |
Always round up. Never round to the nearest whole number. No UK supplier sells partial boxes, and a customer who runs short on flooring mid-job will not come back to you.
Use transparent inputs and outputs so customers can audit the numbers themselves. Separating assumptions such as waste percentage, rounding rules, and whether labour is included from the core area calculation significantly reduces distrust and support queries.
Common compliance and trust pitfalls to avoid:
- Displaying m² and ft² simultaneously without clearly labelling each
- Omitting the waste factor entirely and leaving customers to guess
- Rounding down instead of up on pack quantities
- Not stating whether the estimate includes underlay, trims, or adhesive
- Using ambiguous terms like “approximate” without explaining what is approximated
Build your site structure for flooring leads to support the calculator with clear category pages, product data, and trust signals around it. A great calculator surrounded by a poor website will still underperform.
Testing, refining, and launching your calculator
Once your calculator is logically sound, the final stage is ensuring reliability in real-world scenarios with testing and launch best practices. Do not skip this phase. A calculator that gives wrong results in edge cases can be worse than no calculator at all.
Run through this numbered test plan before going live:
- Basic rectangular room: Input a 4m × 3m room with straight lay and 5% waste. Verify the output matches your manual calculation.
- Non-rectangular room: Test an L-shaped space by inputting two sections. Confirm totals sum correctly.
- Diagonal or herringbone layout: Apply a 12% waste factor and confirm the pack count increases appropriately.
- Custom waste factor: Override the default and enter a custom percentage. Verify the output updates correctly.
- Box rounding: Use a room size that produces a non-round pack count. Confirm the calculator rounds up, not down or to nearest.
- Unit toggle: Switch between m² and ft². Confirm conversions are accurate and labels update throughout the interface.
For a UK rollout, ensure consistent measurement units and support labour or preparation cost inclusions as explicit toggles rather than baked-in assumptions. Customers should always know what is and is not included in the figure shown.
After technical testing, run a real-world usability check.
Pro Tip: Involve your sales staff in mystery-shop testing before launch. Ask them to use the calculator as if they were a first-time customer with a tricky room shape. They will spot issues that developers and managers miss, because they know exactly what questions real customers ask.
Easy fixes that improve usability significantly:
- Add input validation so the calculator will not accept zero or negative dimensions
- Include help text next to the waste factor field explaining what it covers
- Add a “reset” button so users can start over without refreshing the page
- Show a summary panel that updates in real time as inputs change
- Include a prompt at the end of the calculation to request a quote or book a measure
Consider A/B testing your flooring leads post-launch to see which version of your calculator layout or call-to-action converts better. And review common flooring calculator mistakes to make sure you are not repeating errors other retailers have already made.
Why most flooring calculators fail—and what actually works
We have looked at dozens of flooring calculator implementations across UK retail sites. The pattern is consistent. The ones that underperform share the same flaws, and the ones that convert well share the same strengths.
The biggest failure is the black box calculator. The customer enters some numbers, a figure appears, and there is no explanation of how it was reached. No waste factor shown. No rounding rule stated. No breakdown of m² versus packs. When a customer cannot understand or verify the output, they do not trust it. And when they do not trust the tool, they do not trust the business behind it.
Transparent inputs and outputs are what separates a tool that generates enquiries from one that simply sits on a page. When a customer can see every assumption and check every step, they feel in control. That feeling is what drives them to request a quote.
The second failure is poor UK localisation. Calculators built on American templates often default to square feet, use “square yards” for carpet, and apply waste factors that do not reflect UK buying conventions. These small mismatches add friction and erode trust immediately with a British audience.
The third failure is ignoring edge cases. Most UK homes are not simple rectangles. Bay windows, alcoves, L-shaped living rooms, and open-plan kitchen-diners are the norm, not the exception. A calculator that only handles a single rectangular room will fail a large proportion of your actual customer base.
The best-performing calculators we have seen work like a good in-store sales conversation. They ask the right questions in the right order, explain their reasoning, handle awkward room shapes without making the customer feel lost, and end with a clear next step. If you keep your flooring website updated for leads, the calculator becomes a core part of that lead generation engine rather than a bolt-on afterthought.
Bring your flooring calculator to life with expert support
Building a flooring calculator that genuinely converts takes more than a plugin and some product data. It takes clean logic, strong UX, solid testing, and the right placement within a website designed to generate enquiries.

We work exclusively with flooring businesses across the UK to design and build tools like this. Our flooring design services cover everything from wireframing your calculator interface to full development and integration with your existing product catalogue. Once it is live, our SEO for flooring companies ensures the right customers find it. Read our flooring digital marketing guide to see how a calculator fits into a wider strategy that drives consistent, measurable enquiries. Get in touch and let us build something that actually works for your business.
Frequently asked questions
What is the best waste factor to use for online flooring calculators?
Typically, 5% is used for standard straight layouts and 10% or more for complex patterns like herringbone or diagonal configurations. Your calculator should make this adjustable for patterns rather than fixing a single figure for all layouts.
Can I offer both metric and imperial units for UK flooring calculators?
Yes, but always set metric m² as the default, with an optional toggle for customers who prefer feet and inches. For a UK rollout, consistent regional measurement conventions are essential to avoid confusion and maintain trust.
How do I handle multi-room or L-shaped rooms in a calculator?
Allow users to input separate room areas or divide irregular rooms into rectangular sections, then sum the totals. Allowing multiple room inputs and splitting irregular shapes is standard practice for any UK-ready calculator.
Should calculators let users adjust for trims, expansion gaps, or underlay?
Offer clearly labelled adjustable fields for trims and expansion gaps, as these factors directly affect total material requirements. Calculators should let users apply waste factors for cuts, patterns, transitions, and irregular spaces as separate configurable options.
Why should box rounding always round up in the calculator?
Partial packs cannot be purchased or sold, so the calculator must always round up to the next full box or pack. A calculator that rounds up to the next whole box protects the customer from running short mid-installation and reduces after-sales complaints.